Download LosslessCut
Cut, trim, and merge video files in seconds without re-encoding. The fastest way to extract clips from large recordings with zero quality loss.
What Is LosslessCut?
A fast, free video editor built for trimming and merging media files without re-encoding or losing quality.
The Fastest Way to Trim Video
LosslessCut is a cross-platform desktop application that lets you cut, trim, and merge video and audio files without re-encoding. Built on FFmpeg, it works directly with the original file data. That means your 4K drone footage or hour-long screen recording gets split in seconds, not minutes, and the output stays bit-for-bit identical to the source.
The tool was created by Mikael Finstad and released under the GPL-2.0 open source license. It runs on Windows, macOS (Intel and Apple Silicon), and Linux, with downloads available as portable packages that need no installation.
Who Actually Uses It?
Content creators who need to pull highlights from long recordings. Drone pilots chopping through hours of aerial footage. Podcasters splitting episodes into chapters. Security teams extracting clips from surveillance feeds. Anyone who has sat through a painfully slow video export just to remove 10 seconds from the beginning of a file knows why LosslessCut exists.
Where traditional editors like Premiere or DaVinci Resolve re-encode your entire file (which takes time and slightly degrades quality), LosslessCut skips that step entirely. It reads the container format, finds the nearest keyframes, and writes the segments you selected straight to a new file.
More Than a Simple Trimmer
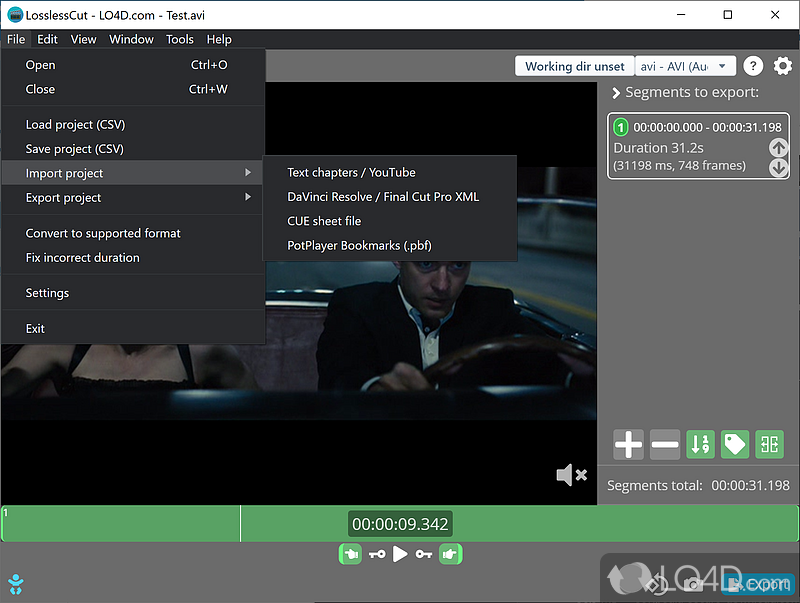
Beyond cutting, LosslessCut handles merging multiple clips, remuxing between container formats (say, MKV to MP4), extracting individual audio or subtitle tracks, and taking frame-accurate snapshots. It includes waveform visualization, keyframe navigation, and segment labeling. You can import chapter markers from YouTube, DaVinci Resolve, or Final Cut Pro XML files, and export your edit decisions in the same formats.
The current version (3.68.0) also ships with an experimental Smart Cut mode that re-encodes only the small portions around cut points, giving you frame-accurate edits while keeping the rest of the file untouched. With nearly 30,000 stars on GitHub, it has a large community that actively reports bugs and suggests improvements.
Key Features
Built on FFmpeg, LosslessCut handles video and audio editing at full speed with no quality loss. Here is what it can do.
Lossless Trimming and Cutting
Trim hours of footage into clips without re-encoding. LosslessCut splits files at keyframe boundaries, keeping the original codec, resolution, and bitrate intact. A 50 GB recording can be cut down in seconds rather than hours.
Merge and Concatenate
Join multiple clips that share the same codec settings into a single file. No transcoding required, just a fast binary stitch.
Smart Cut Mode
Need frame-accurate cuts? Smart Cut re-encodes only the small segments around your cut points. The rest stays untouched, giving you precision without the full re-encode penalty.
Multi-Track Editing
Add, remove, or swap individual audio, video, and subtitle tracks without affecting other streams. Replace a camera mic track with studio audio in one operation.
Waveform and Thumbnails
See audio waveforms and video thumbnails right on the timeline. Visual navigation makes it easy to find the exact frame you need, even in long recordings.
Multiple Segments
Mark multiple cut regions on a single file and export them all at once. Label each segment, tag it, and batch-export when you are ready.
Container Remuxing
Change file containers (MP4 to MKV, MOV to WebM, and more) without touching the encoded streams. This fixes playback issues on devices that are picky about formats.
Scene and Silence Detection
Automatically detect black frames, silent passages, and scene changes. Use these markers to create segments faster than manual scrubbing allows.
Import and Export Formats
Work with segments from CSV, CUE sheets, XML timelines (DaVinci Resolve, Final Cut Pro), YouTube chapter files, and embedded chapter metadata.
Keyboard-Driven Workflow
Every action has a customizable hotkey. Jump between keyframes, set cut markers, and export clips without touching the mouse. Power users can also control LosslessCut through its built-in CLI and HTTP API for scripted batch processing.
Runs on Windows, macOS, and Linux — supports all major video and audio formats via FFmpeg.
Download LosslessCut
System Requirements
LosslessCut runs on Windows, macOS, and Linux. Because it avoids re-encoding, hardware demands stay low even with large files.
| Component | Minimum | Recommended |
|---|---|---|
| Operating System | Windows 10 (x64), macOS 10.15 Catalina, Ubuntu 18.04 / Debian 10 | Windows 11, macOS 14 Sonoma, Ubuntu 22.04 LTS or Fedora 39 |
| Processor | Dual-core x64 CPU, 1.6 GHz or faster | Quad-core Intel i5 / AMD Ryzen 5 or Apple M1 and newer |
| RAM | 4 GB | 8 GB or more for 4K footage and multi-track editing |
| Disk Space | ~300 MB for the application | 500 MB free, plus room for your source media files |
| Display | 1280 x 720 resolution | 1920 x 1080 or higher for comfortable timeline editing |
| GPU | Not required — all processing is CPU-based | Hardware-accelerated video decode helps with preview playback |
| Internet | Not required for core functionality | Needed only for downloading updates |
LosslessCut is an Electron-based application bundled with FFmpeg. macOS users can choose between Intel, Apple Silicon, or Universal installers. Linux users have AppImage, tar.bz2, and ARM builds available including Raspberry Pi support.
Download LosslessCut
Grab the latest release for your operating system. LosslessCut runs on Windows, macOS, and Linux with no installation required on most platforms.
LosslessCut for Windows
64-bit Windows installer. Works on Windows 10 and 11. Extract the 7z archive and run the executable directly – no setup wizard needed.
Download LosslessCutWindows
- x64 (7z) ~226 MB Get
All downloads are served directly from the official GitHub releases page. LosslessCut is free, open-source software maintained by Mikael Finstad. No bundled adware, no sign-up required.
Getting Started with LosslessCut
From download to your first lossless cut in under five minutes. Here is everything you need to know to start trimming video and audio files without quality loss.
Downloading LosslessCut
Head to our download section above to grab the latest version of LosslessCut (currently v3.68.0). The application is available for Windows, macOS, and Linux, so pick the version that matches your system.
For Windows users: The download is a .7z archive, roughly 226 MB. You will need 7-Zip or WinRAR installed to extract it. There is no traditional installer — LosslessCut is a portable application. That means you extract the archive to any folder and run it directly. No installation wizard, no registry changes, no admin rights required.
For macOS users: Choose the DMG that matches your hardware. Intel Macs get the x64 DMG (~261 MB), while Apple Silicon machines (M1, M2, M3, M4) need the arm64 DMG (~273 MB). Not sure which chip you have? Click the Apple menu, then “About This Mac” — it will say either “Intel” or “Apple M-series” under the processor line.
For Linux users: The AppImage (~317 MB) is the easiest option and works on most distributions. Alternatively, install via Snap (sudo snap install losslesscut) or Flatpak from Flathub. There are also tar.bz2 archives for x64 and arm64 if you prefer manual setup.
Installation Walkthrough
Windows:
- Right-click the downloaded
LosslessCut-win-x64.7zfile and select “Extract here” (you need 7-Zip or WinRAR installed). - Open the extracted folder. You will see
LosslessCut.exealong with supporting files like ffmpeg libraries and resource files. - Double-click
LosslessCut.exeto launch. On first run, Windows SmartScreen may pop up with “Windows protected your PC.” Click “More info”, then “Run anyway” — this happens because the app is not code-signed with an expensive certificate, not because it is unsafe. - The main LosslessCut window opens with a dark interface and a large central preview area. You are ready to go.
macOS:
- Open the .dmg file and drag the LosslessCut icon into your Applications folder.
- On first launch, macOS Gatekeeper will likely block the app. Go to System Settings > Privacy & Security, scroll down, and click “Open Anyway” next to the LosslessCut message.
- If you see “LosslessCut is damaged and can’t be opened,” run this in Terminal:
xattr -cr /Applications/LosslessCut.appThen try launching again.
Linux (AppImage):
- Make the AppImage executable:
chmod +x LosslessCut-linux-x86_64.AppImage - Run it:
./LosslessCut-linux-x86_64.AppImage
For Snap users, a single command handles everything: sudo snap install losslesscut
No registration, no account creation, no license key. LosslessCut is free and open-source under the GPL-2.0 license. It launches instantly and you can start working right away.
Initial Setup & Configuration
LosslessCut works well out of the box, but a few settings are worth adjusting before your first real project.
Open Settings by clicking the gear icon in the top-right corner or through the app menu. Here are the key options:
- Output directory: By default, LosslessCut saves exported files next to the source file. If you want all exports going to a single folder, set a custom output directory here. This keeps your projects organized.
- Keyframe cut mode: Under the cut settings, you can choose between “Normal cut” and “Keyframe cut.” Keyframe cut is the default and recommended mode — it ensures lossless output by cutting at the nearest keyframe. Only switch to “Normal cut” if you need frame-exact precision and are okay with a brief re-encode at the cut points (this is the “Smart Cut” feature).
- Auto-convert unsupported formats (enableAutoHtml5ify): Enabled by default. When you open a file the built-in player cannot handle natively, LosslessCut automatically converts it to a playable format in the background. Leave this on unless you have specific reasons to disable it.
- Waveform height: The audio waveform display sits at 40 pixels by default. If you work with podcasts or music, bump this up to 80-100px for better visual detail when setting cut points on audio.
- HEVC/H.265 hardware decoding (enableNativeHevc): Enabled by default. If you edit lots of H.265 footage from drones or cameras, keep this on. Turn it off only if you experience playback glitches with HEVC files.
File associations: LosslessCut does not register itself as a default video player during setup. If you want to right-click a video file and choose “Open with LosslessCut,” you will need to set this manually in your OS. On Windows, right-click any video file, select “Open with” > “Choose another app,” browse to LosslessCut.exe, and check “Always use this app.”
Your First Lossless Cut
Here is a real walkthrough: let’s trim a 10-minute GoPro clip down to the 2-minute highlight.
- Open your file. Drag a video directly into the LosslessCut window, or press Ctrl+O (Cmd+O on Mac) to browse. The video loads in the central preview area, and you will see the audio waveform appear along the bottom timeline.
- Navigate to the start point. Use the arrow keys for frame-by-frame seeking, or click anywhere on the timeline to jump. The , and . keys step back and forward by one frame. Press Space to play/pause.
- Mark the segment start. When you reach the frame where your clip should begin, press I. An orange marker appears on the timeline.
- Mark the segment end. Scrub forward to where the clip should end and press O. The region between the two markers highlights in blue — this is your selected segment.
- Export. Press E or click the export button (the scissors icon in the toolbar). LosslessCut will extract just that segment. Since it is not re-encoding anything, a 2-minute clip from a 4K file exports in just a few seconds.
The output file appears in the same folder as your source video (or the custom output directory you set). The filename includes the segment timestamps so you can identify each clip easily.
Working with multiple segments: Press + to add a new segment after the first one. You can create as many segments as you like on a single file, label them, and export them all at once. Press Backspace to delete a segment you no longer need. The Yin-Yang button in the toolbar inverts your selection — instead of exporting the marked segments, it exports everything except those segments. This is useful for removing unwanted sections from a recording.
Merging clips: To combine multiple files, drag several videos into LosslessCut at the same time. They appear as separate segments in the timeline. Click the merge button in the toolbar to concatenate them into a single output file. The files must share the same codec and resolution for a clean lossless merge.
Key shortcuts you will use constantly:
| Shortcut | Action |
|---|---|
| I | Set segment start point |
| O | Set segment end point |
| E | Export selected segments |
| Space | Play / Pause |
| , / . | Step back / forward one frame |
| + | Add new segment |
| B | Split segment at current position |
| Backspace | Delete current segment |
| Ctrl+Z | Undo last action |
| Shift+/ | View all keyboard shortcuts |
Tips, Tricks & Best Practices
Get accurate cuts with Smart Cut. Standard lossless cuts snap to the nearest keyframe, which can be a few frames off from where you want. If frame-exact precision matters, enable Smart Cut from the cut mode dropdown. It re-encodes only the tiny portion between your chosen frame and the nearest keyframe, keeping the rest lossless. The result is nearly instant and the quality difference is imperceptible.
Use scene detection for long recordings. Under the Edit menu, LosslessCut can automatically detect scene changes, black frames, and silent sections. This is a huge time-saver when splitting a 2-hour meeting recording or a long stream capture into individual segments.
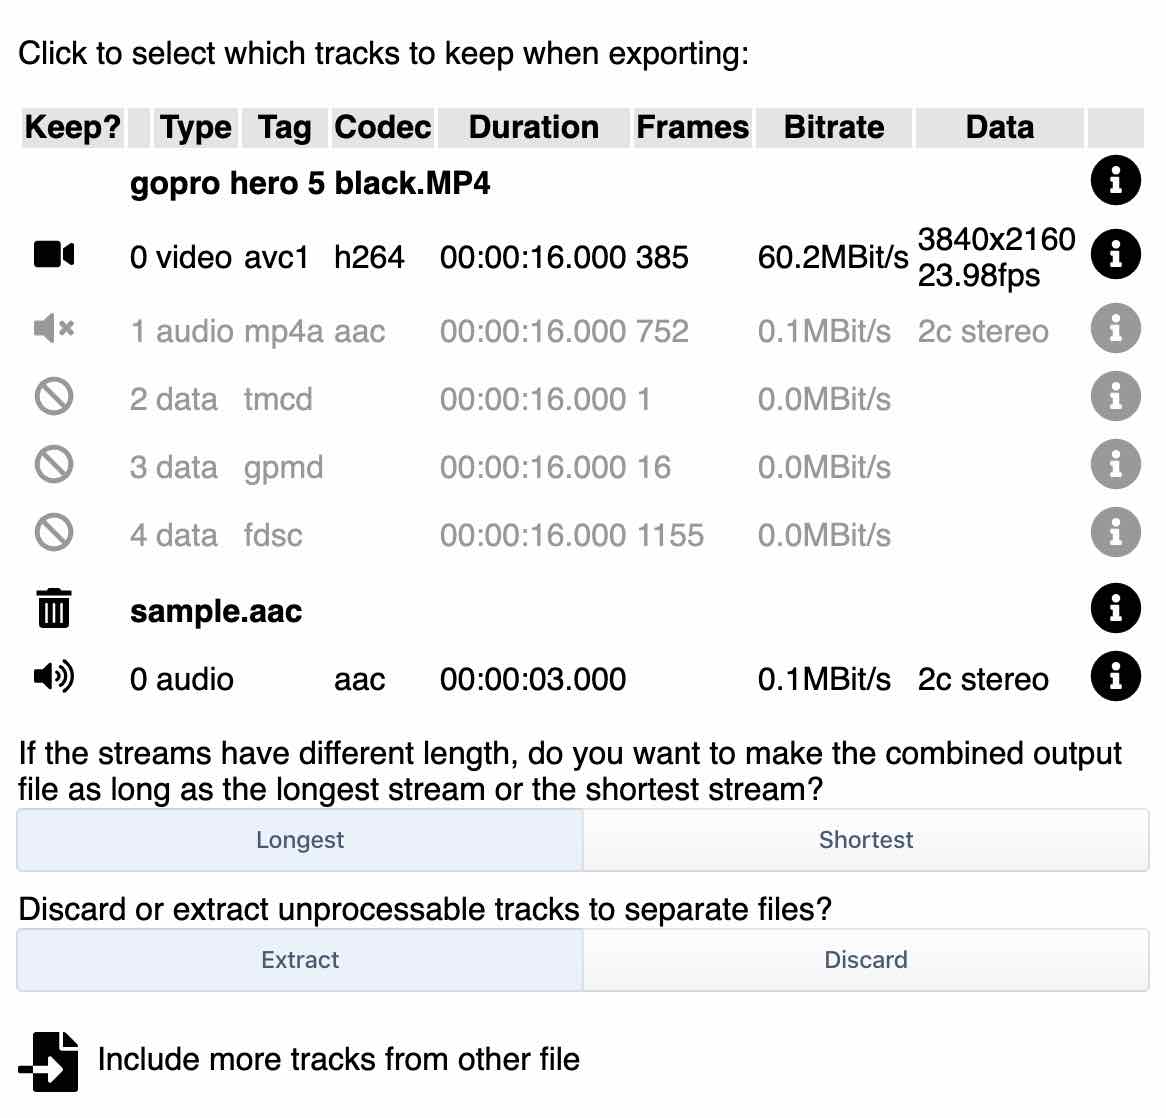
Extract audio or subtitles. Click the track list on the left side of the interface to see every stream inside your file — video, audio, subtitles, data tracks. You can toggle individual tracks on or off before exporting. Want just the audio from a video file? Disable the video track and export. Need to strip out subtitles? Turn off the subtitle track.
Batch processing with CLI. LosslessCut supports basic command-line control. You can pass a file path as an argument to open it directly: LosslessCut.exe "C:Videosmy-clip.mp4" This is handy for integrating LosslessCut into scripts or automated workflows.
Common beginner mistakes to avoid:
- Do not expect frame-perfect cuts in lossless mode — use Smart Cut if you need precision.
- When merging files, make sure they all use the same codec and resolution. Mixing H.264 and H.265 files will produce errors or corrupted output.
- If playback looks choppy, the file format may not be natively supported. Let the auto-convert feature run, or try remuxing to MP4 first.
Stay updated and find help. LosslessCut is actively developed on GitHub with frequent releases. Check the download section for the latest version. The GitHub Discussions board is the best place for questions, and the developer responds regularly. Press Shift+/ inside the app at any time to see the full list of keyboard shortcuts.
Ready to start cutting? Download LosslessCut and trim your first video in seconds.
Screenshots
See LosslessCut in action. Browse the interface, timeline editor, and multi-track view below.
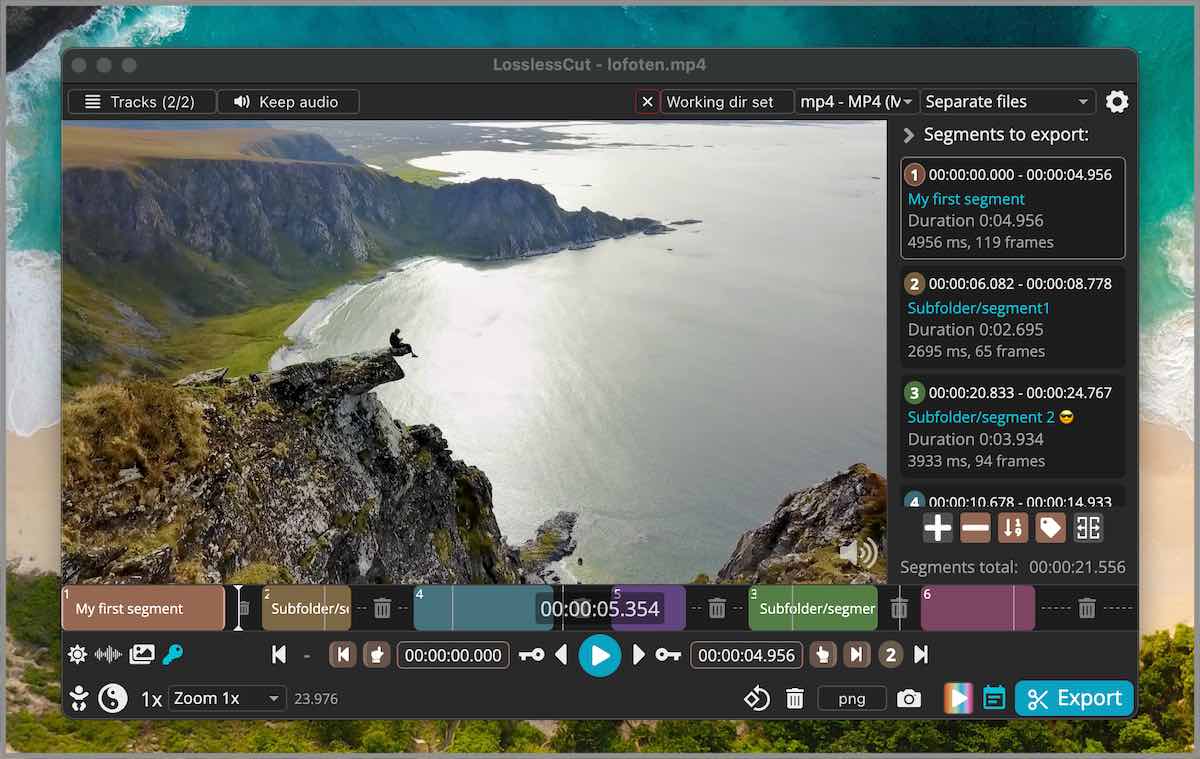
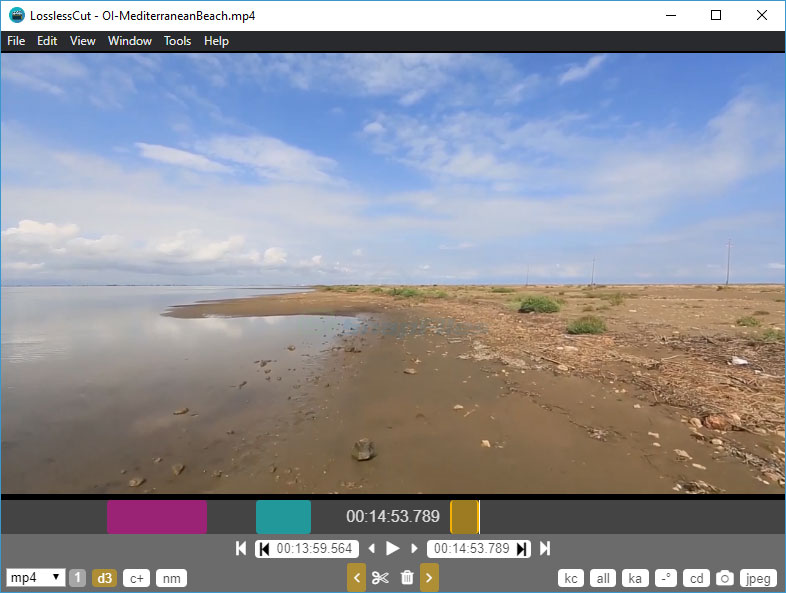
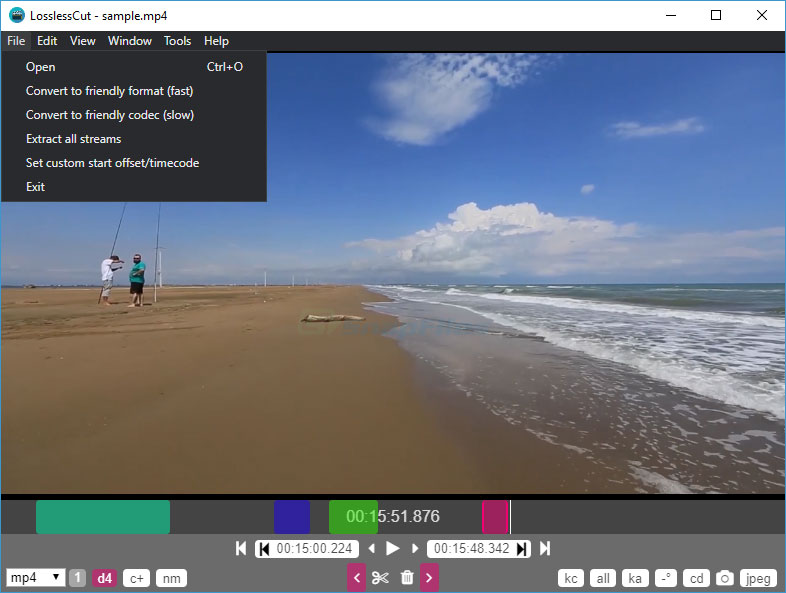
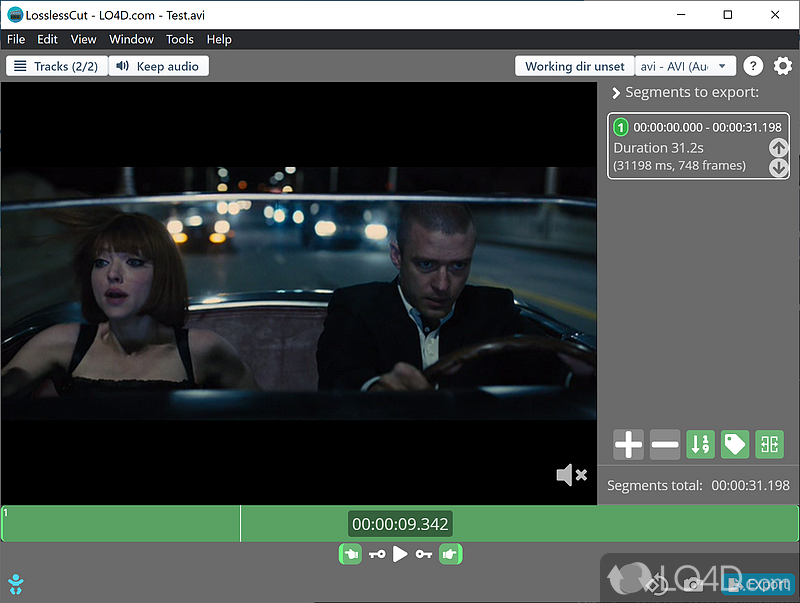
All screenshots from LosslessCut v3.68.0 running on Windows
Frequently Asked Questions
Answers to the most common questions about downloading, installing, and using LosslessCut for video editing.
Is LosslessCut safe to download?
Yes, LosslessCut is completely safe to download. The project is open source under the GPL-2.0 license, and every line of source code is publicly auditable on its GitHub repository, which has over 29,600 stars and an active contributor community. The official releases are built directly from that public codebase and distributed through GitHub Releases.
The Windows installer (7zip self-extracting archive, roughly 226 MB) and macOS DMGs are unsigned, which means your operating system may show a security warning on first launch. This is normal for independent open-source software and does not indicate malware. On Windows, click “More info” then “Run anyway” in the SmartScreen dialog. On macOS, right-click the app and select “Open” to bypass Gatekeeper the first time.
LosslessCut does not collect telemetry, phone home, or bundle third-party adware. The developer, Mikael Finstad (mifi), has maintained the project since 2016. Virus scanners like VirusTotal consistently return clean results on official releases.
Pro tip: Always download from the official download section or directly from GitHub Releases. Third-party download sites sometimes repackage the installer with bundled software you did not ask for.
For full system compatibility details, check the system requirements.
Is LosslessCut free from malware and spyware?
LosslessCut contains no malware, spyware, or adware. As a GPL-2.0 open-source project hosted on GitHub, the entire codebase is visible to anyone. Thousands of developers have reviewed, forked, and contributed to it since its creation in 2016.
The application runs entirely offline after installation. It makes no network requests during normal operation — all video processing happens locally on your machine using the bundled FFmpeg binary. There is no user tracking, no analytics, and no data collection of any kind. The application does not write to any directories outside your chosen output folder.
- No bundled toolbars or browser extensions
- No background processes after closing the app
- No registration or account creation required
- No ads or upsell prompts inside the application
Windows Defender and similar antivirus tools occasionally flag Electron-based apps as suspicious due to their large file size and unsigned binaries. This is a false positive. You can verify by uploading the installer to VirusTotal and comparing the file hash against the one listed on the GitHub Releases page.
Pro tip: If your antivirus quarantines LosslessCut, add an exclusion for the installation folder rather than disabling your antivirus entirely.
Ready to get started? Head to our download section for verified links.
Does LosslessCut work on Windows 11?
Yes, LosslessCut works on Windows 10 and Windows 11 (both 64-bit). Version 3.68.0 has been tested on Windows 11 23H2 and 24H2 without issues. The Windows download is a 7zip self-extracting archive, approximately 226 MB in size.
LosslessCut is built on Electron and uses a bundled FFmpeg binary, so it does not depend on system-wide FFmpeg installations or specific Windows media codecs. It handles H.264, H.265/HEVC, AV1, VP9, AAC, MP3, FLAC, and most other common codecs out of the box through its internal FFmpeg build.
- Download the Windows 7zip installer from the download section
- Extract the archive to any folder (no installer needed — fully portable)
- Run LosslessCut.exe from the extracted folder
- If SmartScreen appears, click “More info” then “Run anyway”
Windows 7 and 8.1 are no longer officially supported since LosslessCut v3.60. If you run an older Windows version, you will need to use LosslessCut 3.59.1 or earlier.
Pro tip: Pin LosslessCut.exe to your taskbar for quick access. You can also add it to the “Open with” context menu by creating a registry entry pointing to the executable.
See the system requirements table for full hardware specs.
Is LosslessCut compatible with macOS and Linux?
LosslessCut runs natively on macOS (Intel and Apple Silicon) and Linux (x64, arm64, and armv7l for Raspberry Pi). It is a true cross-platform tool with dedicated builds for each operating system.
On macOS, three download options are available: Intel DMG (roughly 261 MB), Apple Silicon DMG (roughly 273 MB), and a Universal PKG (roughly 391 MB) that works on both architectures. For macOS Sonoma and newer, you may need to right-click the app and select “Open” the first time to bypass Gatekeeper, since the app is not notarized through Apple.
Linux users can choose between an x64 AppImage (roughly 317 MB), a tar.bz2 archive (roughly 274 MB), or an arm64 build (roughly 208 MB). The AppImage is the easiest option — just make it executable with chmod +x and run it directly.
- macOS: Intel DMG, Apple Silicon DMG, Universal PKG
- Linux x64: AppImage or tar.bz2
- Linux arm64: tar.bz2 for ARM devices and Raspberry Pi
Pro tip: On Linux, if the AppImage fails to launch, install libfuse2 with sudo apt install libfuse2 — many newer distros ship without it by default.
Check the download section to grab the right build for your platform.
What are the minimum system requirements for LosslessCut?
LosslessCut has modest hardware requirements since it avoids re-encoding video. The main bottleneck is disk I/O speed rather than CPU or GPU power, because the tool copies raw video data directly without processing it.
For comfortable operation with files up to 4K resolution, you need a 64-bit operating system (Windows 10+, macOS 10.15+, or a modern Linux distro), at least 4 GB of RAM, and around 500 MB of free disk space for the application. An SSD is strongly recommended, especially when working with large files — trimming a 20 GB video on an HDD can take noticeably longer due to sequential read/write speeds.
- OS: Windows 10/11 (64-bit), macOS 10.15+, or Linux (64-bit)
- RAM: 4 GB minimum, 8 GB recommended for files over 10 GB
- Storage: 500 MB for the app plus enough space for your output files
- CPU: Any modern dual-core processor (FFmpeg handles the heavy lifting)
- GPU: Not required — LosslessCut does not use GPU acceleration for lossless operations
If you are processing many segments from a single large file, memory usage will increase. Users working with 50+ GB files report that 8 GB RAM keeps things smooth.
Pro tip: Close unnecessary browser tabs before working with very large files. Electron-based apps share system memory with Chrome-based processes, and freeing 1-2 GB can prevent slowdowns.
View the full breakdown on our system requirements page.
Is LosslessCut completely free to use?
LosslessCut is free to download and use from GitHub. The project is open source under the GPL-2.0 license, meaning you can use it for personal, educational, and commercial work without paying anything.
There is also a paid version available on the Microsoft Store (Windows) and Mac App Store (macOS), typically priced around $20-25 USD. The store versions are functionally identical to the free GitHub version — same features, same codebase. The store version adds automatic updates through the platform’s update system, a signed binary (no SmartScreen warnings on Windows), and direct financial support for the developer.
The developer, Mikael Finstad, also accepts donations through GitHub Sponsors and PayPal. These are entirely voluntary and do not unlock additional features.
- GitHub version: Free, manual updates, unsigned binary
- Microsoft Store: Paid, auto-updates, signed and verified
- Mac App Store: Paid, auto-updates, notarized for macOS
There are no feature locks, watermarks, trial periods, or usage limits on any version. Every build — free or paid — includes all functionality.
Pro tip: If you use LosslessCut regularly and want hassle-free updates, the store version is worth the price. Otherwise, the GitHub release gives you the exact same tool at no cost.
Get the free version now from our download section.
What is the difference between LosslessCut free and the paid version?
There is no functional difference. The free GitHub download and the paid store versions run the same code and include every feature. You are paying for convenience and developer support, not for extra capabilities.
The paid Microsoft Store version ($20-25 USD) and Mac App Store version offer two practical advantages: automatic background updates and a digitally signed binary. The signed binary means Windows SmartScreen and macOS Gatekeeper will not show security warnings during installation or launch. For enterprise environments where IT policies block unsigned software, the store version may be the only option.
The free GitHub version requires you to manually download new releases when updates are available. LosslessCut does not include a built-in auto-updater in the GitHub build. You can watch the GitHub repository for release notifications or check periodically.
- Features: Identical across all versions
- Codec support: Identical (same bundled FFmpeg)
- Updates: Manual (GitHub) vs automatic (Store)
- Code signing: Unsigned (GitHub) vs signed (Store)
- Price: Free (GitHub) vs $20-25 (Store)
Pro tip: You can install the free version first to test it, then purchase the store version later if you want auto-updates. Your settings and project files work across both versions.
Learn about all the features included in every version on our features page.
How do I download and install LosslessCut step by step?
Installing LosslessCut takes under two minutes. The Windows version is a portable application — no installer wizard, no system changes, just extract and run.
The download is a .7z self-extracting archive, roughly 226 MB for the Windows x64 build. You do not need 7-Zip installed separately; the archive extracts itself when you run it.
- Go to the download section and click the Windows download button
- Save the .7z file to your preferred location (Desktop or Downloads folder)
- Double-click the archive and extract to a folder like
C:ToolsLosslessCut - Open the extracted folder and double-click LosslessCut.exe
- If Windows SmartScreen appears, click “More info” and then “Run anyway”
- LosslessCut opens — drag and drop a video file onto the window to start editing
On macOS, mount the DMG, drag LosslessCut to your Applications folder, and right-click to “Open” the first time. On Linux, download the AppImage, run chmod +x LosslessCut-linux-x86_64.AppImage, and execute it.
Pro tip: Create a shortcut to LosslessCut.exe on your desktop or pin it to the taskbar. Since the app is portable, you can also keep it on a USB drive and run it on any Windows PC without installing.
See our Getting Started guide for a full walkthrough of your first edit.
How to fix LosslessCut installation errors on Windows?
Most “installation” problems with LosslessCut on Windows are not real installation errors. Since LosslessCut is portable software, there is nothing to install — the issue is usually with extraction or first launch.
The most common problem is Windows SmartScreen blocking the executable because it is unsigned. This affects the free GitHub version (the Microsoft Store version is signed). SmartScreen may also block the .7z archive itself if your browser flagged it during download.
- SmartScreen block: Click “More info” then “Run anyway” — this is safe for official GitHub releases
- Extraction fails: Use 7-Zip (7-zip.org) to extract if the self-extractor does not work. Right-click the .7z file and select “Extract here”
- Missing DLL errors: Install the latest Visual C++ Redistributable from Microsoft. LosslessCut bundles most dependencies, but some systems need an updated VC++ runtime
- App will not start (no error): Try running LosslessCut.exe as Administrator. If it still does not start, check Windows Event Viewer (Application log) for crash details
- Antivirus quarantine: Add the LosslessCut folder to your antivirus exclusion list, then re-extract the archive
Pro tip: If you downloaded the .7z file and it is only a few KB in size, the download was incomplete or corrupted. Re-download from the official download section — the correct file should be around 226 MB.
Still stuck? Check the official troubleshooting guide on GitHub for more solutions.
LosslessCut portable vs installer — which version should I choose?
The free GitHub version of LosslessCut for Windows is portable by default. There is no traditional installer with a setup wizard. You extract the archive, and the app runs from that folder.
The Microsoft Store version ($20-25) works like a standard installed app — it integrates with Windows settings, appears in the Start Menu, and receives automatic updates through the Store. It also registers file associations so you can right-click a video and open it directly in LosslessCut.
- Portable (GitHub): Extract anywhere, run from folder, carry on USB drive, no registry changes, manual updates, free
- Store version: Installed via Microsoft Store, Start Menu shortcut, auto-updates, file associations, signed binary, paid
For most users, the portable version is the better choice. It leaves no traces on the system, you can keep multiple versions side by side (useful if a new release introduces bugs), and you can move it between computers on a USB stick. The app stores its configuration in %APPDATA%/LosslessCut regardless of which version you use.
If you are on a managed corporate machine where IT blocks unsigned executables, the Microsoft Store version is your best path. It is signed and distributed through Microsoft’s infrastructure.
Pro tip: Keep the portable version in a cloud-synced folder like OneDrive or Dropbox. Your settings file at %APPDATA%/LosslessCut/config.json can be backed up separately.
Download either version from our download section.
How to fix LosslessCut not opening, crashing, or freezing?
If LosslessCut will not open, crashes on launch, or freezes during use, the issue is usually related to GPU acceleration, corrupted config files, or antivirus interference. Here is a systematic approach to fix it.
LosslessCut is an Electron app (similar to VS Code and Discord), and Electron apps can conflict with outdated GPU drivers or certain integrated graphics configurations. The app also caches state between sessions, so a corrupt state file can prevent it from launching.
- Reset the config: Delete the folder at
%APPDATA%/LosslessCut(Windows) or~/Library/Application Support/LosslessCut(macOS). This clears all settings and cached state - Disable GPU acceleration: Launch from command line with
LosslessCut.exe --disable-gputo rule out graphics driver conflicts - Check antivirus: Temporarily disable your antivirus, then try launching. If it works, add LosslessCut to the exclusion list
- Re-extract the app: Delete the entire LosslessCut folder and extract a fresh copy from the .7z archive. A corrupted file during extraction can cause silent crashes
- Update GPU drivers: Download the latest drivers from NVIDIA, AMD, or Intel. Outdated drivers are the leading cause of Electron app crashes
If LosslessCut freezes while processing a specific file, that file may use an unsupported or unusual codec. Try opening a different video to confirm the app itself works. For problematic files, toggle “Fastest: FFmpeg-assisted playback” in the settings (gear icon in the bottom right) to use software decoding instead of hardware.
Pro tip: Run LosslessCut from the command line (LosslessCut.exe in a terminal) to see error output. Crash messages printed to the console often point to the exact problem.
For more troubleshooting steps, see the Getting Started guide.
Why does LosslessCut cut at the wrong time or add extra frames?
This is the most common complaint about LosslessCut, and it happens because of how lossless cutting works. When you cut without re-encoding, the tool can only split the video at keyframes (also called I-frames), not at arbitrary frame positions.
Most video codecs like H.264 and H.265 use inter-frame compression, where only every 2-10 seconds contain a full frame (keyframe). The frames between keyframes store only the differences from the previous frame. LosslessCut cannot start a segment in the middle of these dependent frames without re-encoding, so it snaps your cut point to the nearest keyframe.
This means a cut you set at 00:01:23.500 might actually start at 00:01:21.000 if that is where the closest keyframe sits. The exported file then includes those extra 2.5 seconds.
- Shift start times: In Export Options (bottom panel), enable “Shift all start times” by +1, +2, or +3 frames to nudge the cut forward past the problematic keyframe
- Use Smart Cut (experimental): This mode re-encodes only the small portions around cut points and copies the rest losslessly. It gives frame-accurate cuts at the cost of slightly longer processing time
- Jump to keyframes: Use the keyframe navigation buttons (or keyboard shortcuts) to place your cut markers exactly on keyframes. The timeline shows keyframe markers as small dots
GoPro, DJI drone footage, and screen recordings typically have keyframes every 1-2 seconds, so accuracy is better. Long-GOP camera recordings (like from DSLRs) have keyframes every 3-10 seconds, which causes larger timing shifts.
Pro tip: Press the left/right arrow keys to navigate frame by frame, and hold Shift + arrow to jump between keyframes. This lets you verify your cut points before exporting.
Learn more about editing techniques in our Getting Started guide.
Why is LosslessCut running slow and how do I speed it up?
LosslessCut should be fast by design — lossless operations copy data directly without processing it. If the app feels sluggish, the bottleneck is almost always disk speed, file size, or the preview renderer rather than CPU.
When working with files larger than 10 GB (common for long recordings from cameras or screen capture), the timeline thumbnail generation can take significant time. LosslessCut generates these thumbnails by seeking through the file, and on a mechanical hard drive, this random access pattern is very slow compared to an SSD.
- Use an SSD: Move your source files to an SSD before editing. The difference for a 20 GB file is dramatic — thumbnail generation goes from minutes to seconds
- Disable thumbnails: In the View menu, you can toggle thumbnails off to reduce the initial load time
- Close other apps: LosslessCut is an Electron app that uses 400-800 MB of RAM. If your system has 4 GB total, other apps compete for memory
- Reduce zoom level: Zooming far into the timeline increases the number of thumbnails rendered. Keep a moderate zoom level
- Update the app: Version 3.68.0 includes performance improvements for thumbnail rendering and timeline navigation compared to earlier releases
Export speed depends entirely on disk write speed. Lossless export of a 5 GB file on an NVMe SSD takes roughly 10-15 seconds. The same file on a USB 2.0 external drive might take 3-4 minutes.
Pro tip: Set your output directory to the same drive as the source file. Copying between different drives doubles the I/O load.
Check whether your hardware meets recommendations on the system requirements page.
How do I update LosslessCut to the latest version?
The update process depends on which version you installed. The free GitHub version requires a manual update, while the Microsoft Store and Mac App Store versions update automatically.
The latest stable release is version 3.68.0 (released January 29, 2025). Each release includes bug fixes, new format support, and UI improvements. The changelog is published on the GitHub Releases page with detailed notes on what changed.
- GitHub portable (Windows): Download the new .7z archive from the download section, extract it to a new folder, and delete the old version. Your settings at
%APPDATA%/LosslessCutare preserved automatically - Microsoft Store: Updates install automatically in the background. You can force a check in the Microsoft Store app under Library > Get updates
- Mac App Store: Same as Microsoft Store — automatic updates through the system
- Linux AppImage: Download the new AppImage, make it executable with
chmod +x, and replace the old file
You can keep multiple portable versions side by side. This is useful if a new release breaks something for your workflow — you can always fall back to the previous version.
Pro tip: Star the GitHub repository and enable “Releases only” notifications to get an email whenever a new version drops. Updates happen roughly every 1-3 months.
Explore the latest features on our features page.
What is new in the latest version of LosslessCut?
Version 3.68.0 (January 29, 2025) brought several improvements focused on stability and user experience. This is a mature release with over 70 prior versions of refinement.
LosslessCut has evolved significantly from a basic video cutter into a comprehensive media toolkit. Recent versions added Smart Cut for frame-accurate cutting, GPS map view for DJI drone footage, improved waveform visualization, and HTTP API support for automation. The batch processing workflow now handles hundreds of files efficiently.
- Smart Cut mode: Re-encodes only the frames around cut points for frame-accurate results while keeping everything else lossless
- GPS map view: Displays GPS track data from DJI drones and GoPro cameras on an interactive map alongside the timeline
- Improved segment handling: Better performance when working with 50+ segments in a single file, with labels and color coding
- JavaScript expressions: Run custom JS expressions for batch renaming output files and computing segment times
- HTTP API: Control LosslessCut remotely from scripts and other applications
- Black scene and silence detection: Automatically find scene boundaries and silent passages for easier segmenting
Each release also includes FFmpeg updates, which means support for newer codecs and containers improves over time. AV1 support, for example, has improved in recent FFmpeg builds.
Pro tip: Check the GitHub Releases page for nightly builds if you want to test features before they reach stable. Nightly builds may have rough edges but include the newest fixes.
See all capabilities on our features page.
LosslessCut vs Avidemux vs HandBrake — which is better for video trimming?
For lossless video trimming, LosslessCut is the fastest and simplest option. Avidemux offers more precise I-frame cutting for certain formats. HandBrake always re-encodes, so it is not suitable for lossless trimming at all.
LosslessCut processes a 10 GB video trim in seconds because it copies raw data without touching the codec layer. Avidemux does the same but has a more traditional video editor interface with preview playback and filter options. HandBrake is a transcoder built for format conversion and compression — every export goes through a full encode cycle, which takes minutes to hours and introduces generation loss.
- LosslessCut: Best for quick rough cuts, merging clips, and extracting segments from large files. Handles batch operations and multi-track editing. Free, open source, 226 MB
- Avidemux: Better for frame-accurate cuts with preview. Supports basic filters (resize, deinterlace). Slightly steeper learning curve. Free, open source, roughly 30 MB
- HandBrake: Wrong tool for lossless work. Use it when you need to convert formats, compress files, or add subtitles. Free, open source, roughly 20 MB
The key distinction: LosslessCut and Avidemux preserve original quality because they skip re-encoding. HandBrake always re-encodes, which reduces file size but also reduces quality (even at high bitrate settings). If you need zero quality loss, HandBrake is not the right tool.
For command-line users, FFmpeg (which powers LosslessCut under the hood) offers the same lossless cutting with full scriptability. LosslessCut is essentially a GUI wrapper that makes FFmpeg’s trimming features accessible without memorizing command syntax.
Pro tip: Use LosslessCut for the initial rough cut, then open the result in Avidemux or DaVinci Resolve if you need frame-level precision or effects. This hybrid workflow saves hours on large projects.
Explore what LosslessCut can do on our features page.
Can LosslessCut merge multiple video files into one?
Yes, LosslessCut can merge (concatenate) multiple video files into a single output file without re-encoding, as long as all files share the same codec, resolution, and frame rate. This is one of its most useful features for combining split recordings.
Many cameras and screen recorders split long recordings into multiple files (often at 4 GB boundaries due to FAT32 limitations). GoPro cameras create files named GOPR0001.MP4, GP010001.MP4, GP020001.MP4 and so on. LosslessCut can stitch these back together in seconds.
- Open the first file in LosslessCut by dragging it onto the window
- Go to Tools > Merge/Concatenate files (or press the merge button in the toolbar)
- Add all the files you want to combine in the correct order
- Click “Merge” — LosslessCut will concatenate them without re-encoding
The merge operation copies the raw data streams sequentially. If the files have different codecs, resolutions, or frame rates, the merge will either fail or produce a file with playback issues. For mixed-format files, you would need a tool like HandBrake or FFmpeg to re-encode everything to a common format first.
You can also use segments within LosslessCut to reorder clips. Mark segments in different files, then export them as a merged output in your chosen sequence.
Pro tip: Use the “Include all streams” option when merging to preserve all audio tracks, subtitle tracks, and metadata from the source files. By default, LosslessCut may only include the primary video and audio streams.
Learn how to merge files step by step in our Getting Started guide.
How do I extract audio from a video using LosslessCut?
LosslessCut can extract audio tracks from any video file without re-encoding the audio. The extracted audio keeps its original quality, codec, and bitrate. This works for MP4, MKV, MOV, WebM, and every other container format FFmpeg supports.
The extraction process takes seconds regardless of file length because LosslessCut copies the raw audio data directly. Extracting a 90-minute podcast audio track from an MP4 file is nearly instantaneous on an SSD.
- Open the video file in LosslessCut
- Click the Tracks panel on the left side (or go to Edit > Tracks)
- Disable (uncheck) the video track — keep only the audio track(s) enabled
- Set your segment markers if you only want a portion of the audio
- Click Export — LosslessCut outputs only the audio in its original format (AAC, MP3, FLAC, etc.)
The output file extension depends on the audio codec: AAC audio gets saved as .m4a, MP3 stays as .mp3, FLAC becomes .flac, and PCM/WAV saves as .wav. LosslessCut automatically picks the right container for the codec.
If the video has multiple audio tracks (common in movies with different languages), you can select which tracks to extract. Each track can be exported individually or all together in a multi-track container like MKV.
Pro tip: To extract a thumbnail image at any point in the video, use the snapshot feature (camera icon or press C) instead. Snapshots save as JPEG or PNG depending on your settings.
See more editing capabilities on our features page.
What is the .llc project file that LosslessCut creates?
The .llc file is a LosslessCut project file that saves your segment markers, labels, and editing state for a specific media file. It is a small JSON text file, usually under 10 KB, stored alongside your exported video.
When you define segments, add labels, or set export options for a file, LosslessCut saves that work as a .llc project file. The next time you open the same media file, LosslessCut detects the .llc file and restores all your segments and settings automatically. This is useful when you work on a large file over multiple sessions.
- Format: Plain JSON text (you can open it in any text editor)
- Size: Typically 1-10 KB depending on the number of segments
- Contents: Segment start/end times, labels, tags, and per-segment export settings
- Location: Same directory as the source media file, named
[filename]-proj.llc
You can safely delete .llc files after you finish editing. They are not needed for playback of the exported video. If you want to prevent LosslessCut from creating them, there is currently no built-in toggle — the project file is always generated when you define segments.
The .llc format is also how you can share edit points with another LosslessCut user. Send them the .llc file along with the original video, and they will see your exact segment markers.
Pro tip: You can import and export segments as CSV, CUE sheets, XML (DaVinci Resolve, Final Cut Pro), and YouTube chapter formats through the File menu. This lets you move edit data between LosslessCut and professional NLEs.
Learn about all supported export formats in our features overview.
Have more questions? Check the LosslessCut GitHub Discussions or download LosslessCut and try it yourself.